 English
 Chinese
 Russian
 French
 Spanish
 Arabic
 German
 Dutch
Dutch Portuguese
 Italian
 Turkish
 Korean
 Japanese
 Thai
Thai Czech
Czech Traditional Chinese
 Indonesian
 Vietnamese
 Hungarian
 Malay
Malay Swedish
 Finnish
 Danish
 Norwegian
 Polish
 Greek
Greek
- Machine d enroulement et de liage de câbles
- Machine d enroulement de ruban
- Machine semi-automatique à brosser les fils
- Machine de coupe et dénudage de fils
- Machine de sertissage semi-automatique
- Lames pour pince à dénuder et sertir
- Testeur de traction pour cosses
- Machine de tronçonnage
- Machine d étiquetage de câbles
- Outil de cerclage
- Cosses de fil et connecteurs
- Distributeur automatique de ruban
- Machine de sertissage de fils automatique
- Outils de sertissage de cosses
- Alimentateur automatique de fil
- Machine à souder automatique
- Machine à poser les serre-câbles en nylon
- Presse à injecter
- Machine de brasage et soudage
- Machine de vissage
- Machine de sertissage pour cordon d alimentation
- Testeur de faisceau de câbles
- Robot de distribution de colle
- Matériaux d emballage pour faisceaux de câbles
- Équipement auxiliaire pour faisceaux de câbles

Manuel d'utilisation de la machine de dénudage de fils intelligente à grand écran tactile
Ce manuel d'utilisation officiel couvre les machines de dénudage de fils à écran tactile carré de grande taille de niveau supérieur prenant en charge la coupe de fils BV/BVR/gainés de 1,0 à 185 mm², le dénudage de la tête/queue/milieu et trois couches, motorisé sans source d'air, panneau tactile bilingue de 7 pouces et garantie de 3 ans.
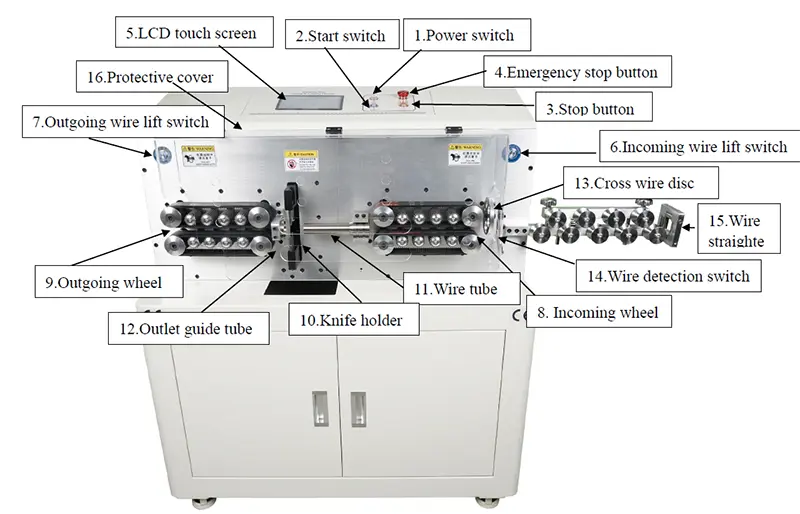
Parts description as shown in the figure:
1.Power switch:This is the switch that turns on the power to the machine.
2.Start switch:Press this button and the machine starts running. If the machine is not manually reset after starting up, the machine will automatically reset and start running; if the machine has been reset, the machine will start running directly.
3.Stop button:Press this button in working status, the machine will complete a cycle of action and then stop.
4.Emergency stop button:Press this button in working status, the machine will stop instantly.
5.LCD touch screen:Displays the parameters of the machine, and all parameters are input via the LCD touch screen.
6.Incoming wire lift switch:Each press can automatically close the upper and lower wheels of the incoming wire.
7.Outgoing wire lift switch:Each press can automatically close the upper and lower wheels of the outlet wire.
8.Incoming wheel:When the synchronous belt rotates, the wire is advanced and transported, and the knife holder is used to peel off the sheath of the thread end.
9.Outgoing wheel:When the synchronous belt rotates, the wire is advanced and transported, and the knife holder is used to peel off the outer skin of the wire end.
10. Knife holder:Cutter device, wire cutting and stripping are completed by the knife holder assembly.
11. Wire tube:The wire is delivered to the knife edge through this tube.
12. Outlet guide tube:Help the wire pass smoothly and complete the tail stripping action better
13. Cross wire disc:The wire passes through this disc hole.
14. Wire detection switch:When the wire detection switch is turned on in the function settings, the machine will alarm if there is no wire.
15.Wire straightener:After straightening the bent cable, the stripping effect will be more ideal.
16.Protective cover:Protect operational safety.
2. Control panel operation instructions
Turn on the power and the LCD screen will display as shown:
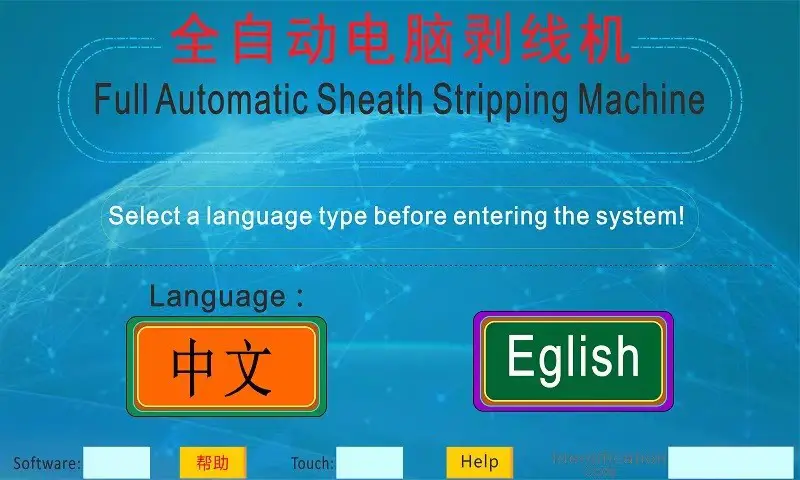
Freely switch between Chinese and English, please select "Chinese" or "ENGLISH" to enter the next page.
Description of each button for parameter setting:
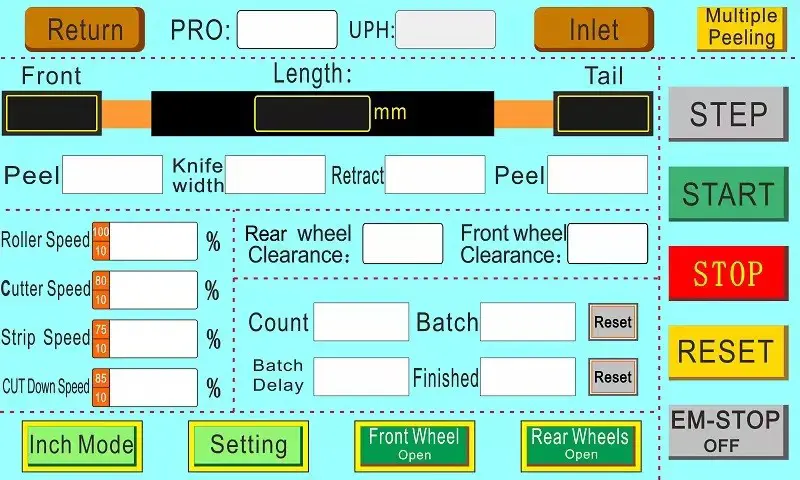
Inlet: Press the wire feeding button to transport the wire to the cutting edge and adjust it as needed.
Return: Press the wire retraction button to retract the wire away from the cutting edge until it exits the crimping wheel.
PRO:This is program number. The wires of different specifications or different stripping sizes that need to be processed are saved in each different program number so that they can be recalled and used during the next processing.
Length:The total length of cut and stripped wires (maximum 100m).
Front:The length of the thread should be peeled off the outer sheath; it is also the length of the copper wire after the outer sheath is removed.
Peel:When the value of stripping is bigger than the value of the thread end, it is full stripping, otherwise it is half stripping.
Tail:The length of the wire tail with the outer sheath peeled off; that is, the length of the copper wire exposed after the outer sheath is removed.
Peel:When the stripping value is bigger than the value at the end of the line, it is full stripping, otherwise it is half stripping.
Knife width:The depth at which the cutter cuts the outer skin when peeling. The larger the knife width, the shallower the cut.The smaller it is, the deeper it will be cut.
(Important reminder): The wire diameter value can be entered according to the actual wire outer diameter, but it should be slightly smaller than the actual size by about 1-2mm to cut the outer skin. For example: the outer diameter of the wire outer sheath is 10mm, and the wire diameter should be entered around 8. If the copper wire is damaged, increase the value; if the wire head or tail cannot be peeled off, decrease the value)
Retract:The value that the cutter will retract after cutting into the wire when peeling off the skin; to ensure that the cutter can catch the wire and peel off the skin. The thicker the wire, the larger the retraction value, and the thinner the wire, the smaller the retraction value.
(Retract value: usually set about 1-4, which means the cutter retracts 1-4mm)
Roller speed:The rotation speed of the incoming and outgoing synchronization wheels can be adjusted in the range of 1-100, with 1 being the slowest and 100 being the fastest.
Cutter speed:Set the running speed of the cutter, the adjustable range is 1-100, 1 is the slowest and 100 is the fastest.
Strip speed:The speed of stripping off the wire sheath can be adjusted in the range of 1-100, with 1 being the slowest and 100 being the fastest.
Cut down speed:Set the running speed of the cutter when cutting copper wire. The adjustable range is 0-100, with 100 being the slowest.(Note: When cutting BV hard wire, if the cutting is continuous or difficult, set the deceleration value. The larger the value, the slower the cutting, and the greater the cutting force)
Front wheel clearance:Adjust the size of the gap between the upper and lower inlet pressure rollers. The larger the value, the larger the gap; otherwise, the smaller the gap. (Important reminder:For example, entering a value of 8 means that the upper and lower wheels are spread about 8mm. Assuming that the outer diameter of the wire is 10mm, the input is about 2mm smaller than the actual diameter to compress the wire. But it cannot be too smaller than the actual outer diameter of the wire, otherwise it will cause the motor to lose steps and cause the stripping length to change. The upper and lower wheels should be opened to an appropriate size. It is the key to successful stripping the wire.)
Rear wheel clearance:Adjust the size of the gap between the upper and lower outlet pressure rollers. The larger the value, the larger the gap; otherwise, the smaller the gap. (Important reminder:If the wire end cannot be stripped, reduce the gap value of the incoming wire wheel to increase the pressure. If the wire end cannot be stripped, reduce the gap value of the outlet wheel to increase the pressure).
Count: Set the planned production quantity. When the wire processed by the machine reaches this value, the machine will automatically stop and give a prompt.
Batch:Set the production bundling quantity, and the machine can pause for a few seconds when reaching the quantitative number, and pause according to the time input by the timer.
Finished: Displays the actual total quantity currently produced. When "Finished" = "Count", the machine automatically stops.
Batch delay:When the machine reaches the set "Batch" number, the machine will pause according to the set time. If it is set to 1, it will pause for 1 second, if it is set to 2, it will pause for 2 seconds, and so on. When set to "0", the machine stops and you need to manually press the start button to continue running.
Step:Press the start button in the automatic mode, and the machine will automatically run to the set total value and then stop; press the start button in the single-step mode, the machine will only work for one step, press the start button before continuing to the next step; in the single-cycle mode Press the start button and the machine will run for one cycle (cutting one line)
Start:Press the start button and the machine will start running until the processed quantity reaches the set total quantity.
Stop:Click the stop button and the machine will stop running and automatically stop after completing the currently processed wire.
Reset:If there is no manual reset, you can press the reset button to reset and then start the machine, or you can directly press start and the machine will automatically reset.
EM-stop off:Press this button in working status, the machine will stop instantly.
Front wheel open/ Rear wheel open:
The function is consistent with the switch on the panel "6.Incoming wire lift switch, 7.Outgoing wire lift switch".
【Inch mode】
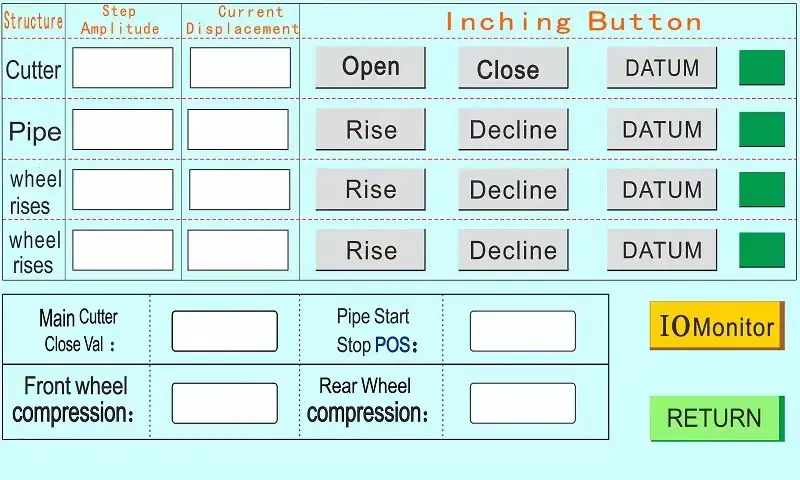
【Open/Close/Datum】
These three buttons are switches that need to be called when calibrating the cutter.
Open:When you click "Open" continuously, the upper and lower cutters will slowly open a certain distance.
Close:When you click "Close" continuously, the upper and lower cutters slowly approach each other until the closures cross each other.
Datum:Click the "Datum" button to quickly return the cutter to the original position.
【Rise/Decline/Datum】
These three buttons are used to manually test the specific positions of the conduit, incoming line lifting wheel, and outgoing wire lifting wheel.
Rise:When "Rise" is clicked, the conduit jumps upward, and the inlet and outlet lift wheels open.
Decline:When "Decline" is clicked, the conduit jumps downward and the inlet and outlet lift wheels close.
Datum:When "Datum" is clicked, the conduit, incoming wire lifting wheel, and outgoing wire lifting wheel return to the origin respectively.
Main cutter close val:Press the reset button on the home page, then return to this page and continuously click the close switch to close the upper and lower knife edges to the intersection zero point, and then enter the value displayed by the current displacement into the tool setting reference box. (Note: After the adjustment is completed, when entering the wire diameter value on the home page, you can refer to the actual outer diameter of the wire and enter it accordingly to facilitate debugging. Please refer to the “knife width” button instructions for specific operations Pipe start stop POS:Set a value to keep the tube in a horizontal state. If the value increases, the tube head will move downwards. If the value decreases, the catheter head will move upward. Adjust accordingly according to the actual position of the catheter.
Front wheel compression:
Rear wheel compression:
【IO monitor】
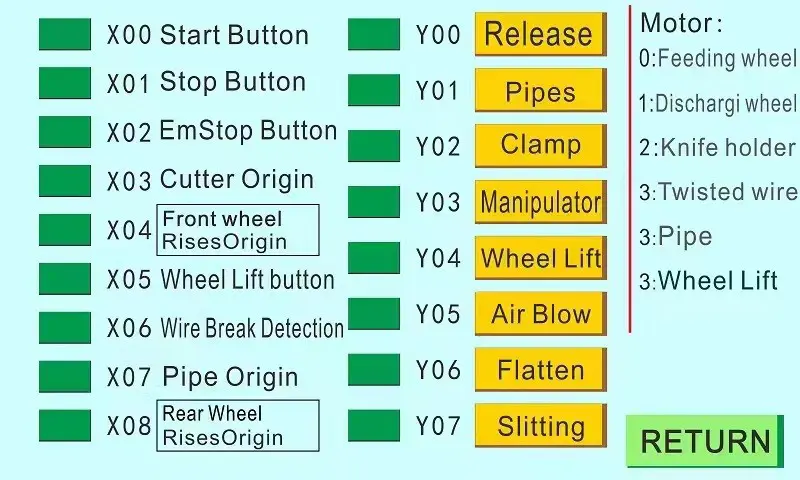
Each IO monitoring point corresponds to each wiring point on the motherboard. This monitoring is usually turned on when the machine has an abnormality to determine the problem. You can manually press the buttons in the IO to test whether each function operates normally.
【Function settings】
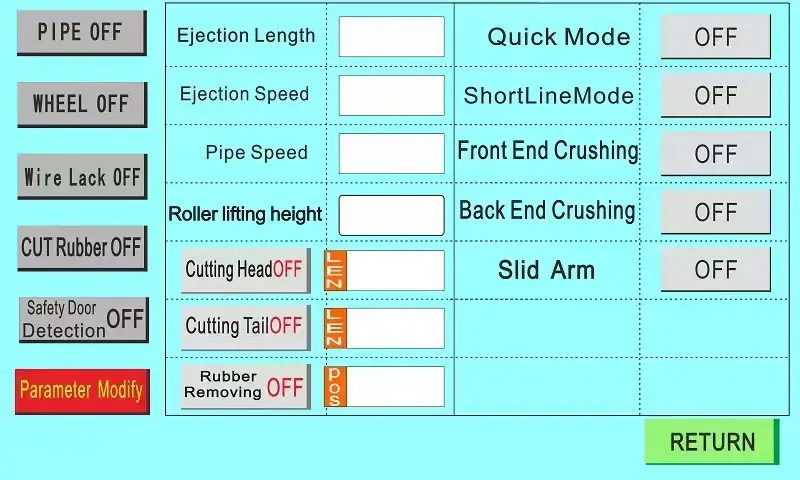
Pipe (ON/OFF): The pipe can jump up and down.
Wheel(ON/OFF): The outlet wheel can be lifted when stripping the wire end.
(Enter a value in the “roller lifting height” box, which is the wheel lifting height)
Wire lack off:After turning on the switch, it detects that there is no wire, and the machine automatically stops.
Safety door detection:After turning on this switch, the machine will automatically stop after the safety door is opened.
Ejection length:The distance that a wire is transported after cutting and stripping.
Ejection speed:The speed at which the wire is fed out after cutting and stripping it.
Pipe speed:The speed at which the motor lifts the catheter.
Roller lifting height:When the lifting wheel (on/off) is turned on, the height at which the outlet wheel is raised when stripping the wire end is to avoid pressing the wire end and preventing stripping. (Reference value: 3-5)
Quick mode (ON/OFF):
Short line mode (ON/OFF):Open when stripping ultra-short wires.
Slid arm (ON/OFF):The machine with the manipulator is turned on.
Cutting head (ON/OFF):Make a cutting motion to tidy up the threads.
Cutting tail (ON/OFF):Do the tail-cutting action to tidy up the ends of the thread.
Rubber removing (ON/OFF):When stripping the head completely, avoid blocking the outlet with the outer skin.
Then turn on this switch to allow the outlet wire pressing wheel to automatically roll out of the wire sheath. (Reference value: 50-70)
【Parameter modify】
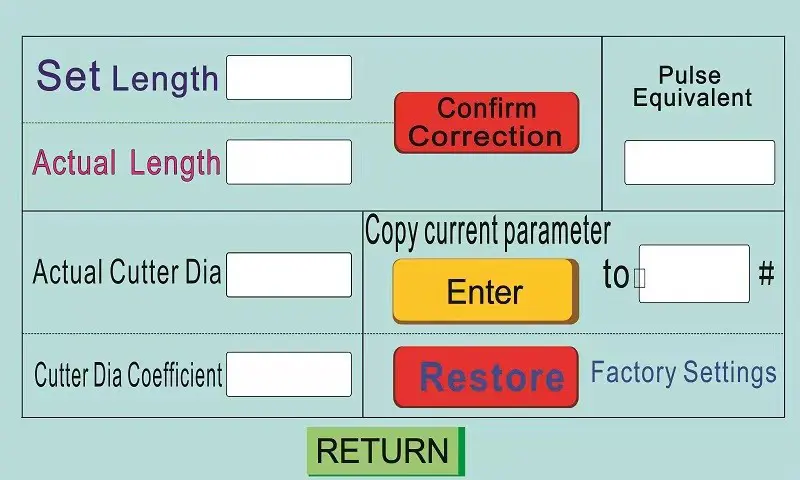
Parameter modify:It is a correction made when there is an error in the actual length of the processed wire.
Set length:The set length value is the total length value originally entered.
Actual length:The actual length value cut by the machine. After inputting the actual value, press “confirm correction”, and the length of the line cut by the machine will be automatically corrected.
Actual cutter dia:Actual wire diameter set.
Cutter dia coefficient:Under normal circumstances, there is no need to set it, it is the system default.
Restore:Press this button to restore all machine parameters to factory settings. Use the restore button with caution.
Copy current parameter:Copy the current program number parameters to other programs, for example: enter 1 and press the confirm key, then all parameters of the current program will be copied to program No. 1. If the original program No. 1 has parameters, the original parameters will be overwritten.
【Multi-layer peeling】
(Peel off the outer skin in three layers from outside to inside or from inside to outside)
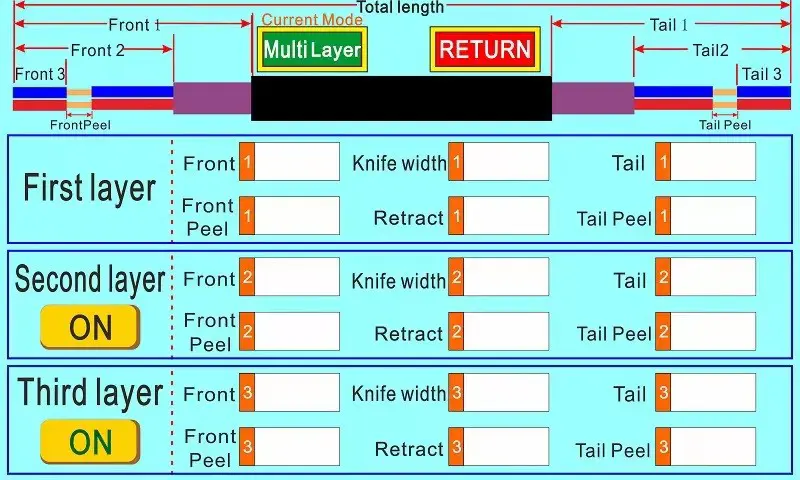
For example, as shown in the figure: the wire sheath diameter D=10mm, the C layer diameter C=8mm, the B layer diameter B=4mm, the length of section A is 10mm, the length of section B is 30mm, and the length of section C is 30mm.

The settings are as follows:
Level one:wire head 1=A+B+C=70, Strip off the head 1=80, knife width 1=9, Retract 1=2
Note: Enter 70 for the wire end and 80 for the stripping end, which means peeling off the entire C layer. Knife width 9 means that the cutter cuts to a depth of 9mm, which is a little smaller than the actual diameter of the D layer of the outer skin. The retract of the cutter is also 2mm.
Level two:wire head 2=A+B=40, Strip off the head 2=50, knife width 2=7, retract 2=1
Note: Enter 40 for the wire end and 50 for the stripping end, which means peeling off the entire B layer. Knife width 7 means that the cutter cuts to a depth of 7mm, which is a little smaller than the actual diameter of the C layer of the outer skin. The retract of the cutter is also 1mm.
Level three: wire head 3=10, Strip off the head 3=15, knife width 3=3, retract 3=0.5
Note: Enter 10 for the wire end and 15 for the stripping end, which means peeling off the entire A layer. Knife width 3 means that the cutter cuts to a depth of 3mm, which is a little smaller than the actual diameter of the B layer of the outer skin. The retract of the cutter is also 0.5mm.
【Multi-stage peeling】
(Make the wire into three sections and peel them off in the middle)
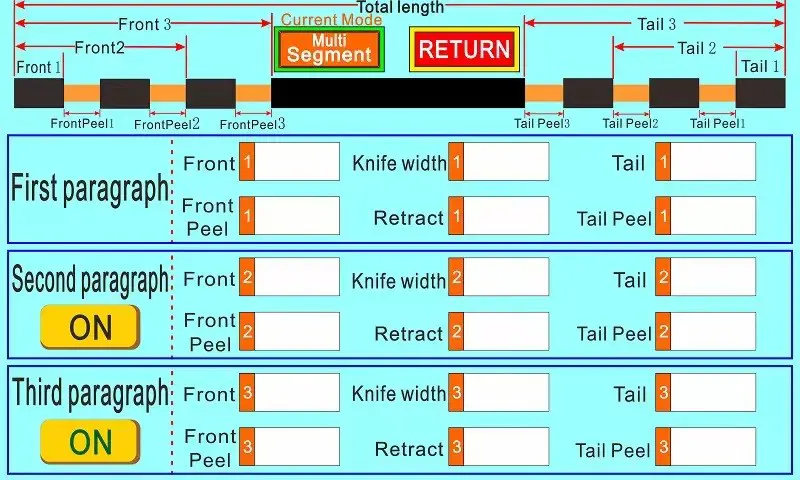
For example, as shown in the figure: the outer diameter of the wire sheath is 10mm, the stripped length of section A is 20mm, the stripped length of section C is 20mm, and the stripped length of section E is 20mm.

First section: wire head 1=A+C+E=60, Strip off the head1=70, knife width1=9, retract 1=2
Note: Input 60 for the thread end and peel 70 for the three ends, which means that the total of the three places is pushed to 70 for all stripping. The wire diameter 9 means that the cutter cuts to a depth of 9mm, which is a little smaller than the actual diameter of the outer sheath. The retract of the knife also goes back 2mm.
Second section: wire head 2=A+B+C+E=80, Strip off the head 2=C+E=40, knife width2=9, retract 2=2
Note: Entering 80 for the thread end and peeling 40 means pushing 40 away at 80. The wire diameter 9 means that the cutter will cut to a depth of 9mm, which is a little smaller than the actual diameter of the outer sheath. The retraction of the knife will also go back 2mm.
Third section: wire head 3=A+B+C+D+E=100, Strip off the head 3=E=20, knife width3=9, retract 3=2
Note: If the thread input is 100 and peeling 20 means pushing 20 away at 100, the wire diameter 9 means the cutter will cut to a depth of 9mm, which is a little smaller than the actual diameter of the outer sheath, and the retracting knife will also retreat 2mm.
Tips for stripping and debugging:
When debugging after inputting parameters, first switch the "automatic" mode to the "single-step" mode to test the wire. After achieving satisfactory results, switch to the "automatic" mode to formally process the wire.


Scan to Chat
 sales@cablecutting.net
 kevin201166
 +86-18965153335